Wednesday, June 25, 2014

Lesson 1 - Introduction


RECAP: 

  • Learn a few quick, easy techniques that you can use with tools and food you may already own.

  • Learn a little of the Science Stuff behind cooking to free you from recipes and gadgets.

  • Learn how to cook with fresh, healthy, food and eat less processed, boxed and bagged food.


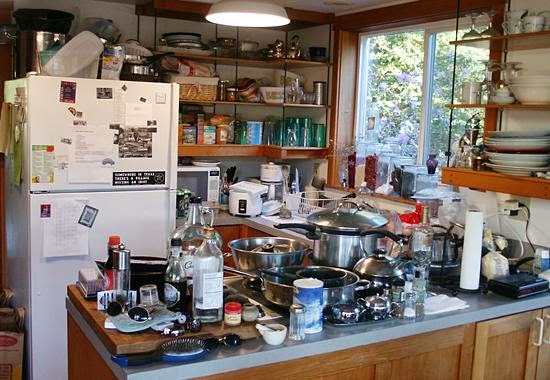
Look familiar? You're thinking, "How can I cook in this mess?" Then you spot that one little empty spot near the sink that would be just big enough for a KFC bucket. I don't have to finish that story. 

I won't help you clean your kitchen, but I can tell you to yard sale most of the crap hogging up your counter and cabinet space. Part of my aversion to the kitchen used to be the clutter. All of us have way too many kitchen gadgets and one-use pots, pans, and utensils that we bought with all good intentions; "THIS will motivate me to cook! Look, honey, it has a special compartment for Lobster Claws!" You have trouble resealing the fish stick box properly, but you need something for lobster claws? REALLY?

Put all that in past. Box the industrial strength food processors, eight blade yogurt makers, and  twelve piece spatula sets. I'm going to show you how to make amazing, simple food with a knife, a pan, and ingredients you probably already have in your fridge or freezer.

Most of it takes about ten to twenty minutes to learn - you have twenty minutes, right? Most of it uses food that you're already eating from frozen, or that was cut up and seasoned in a factory somewhere, but we're going to use the real deal. We're going to go slow, do one thing at a time, and I'll explain everything you need to know - just pause the videos when you need more time. No one's rushing you.

None of this stuff is difficult, it's just unknown to many home cooks. When Rachael Ray says "dice the onion," I used to yell at her, "BUT HOW DO YOU DICE THE ONION!??" That's the stuff I want to show here. Once you know, you'll start to enjoy food and cooking, and you won't need me anymore. Then my ad revenue will go down and I'll have to eat Ramen noodles and freezer chicken nuggets to get by. Kind of like some of you are doing right now because you're scared of the kitchen.

And so we come full circle. 


Thursday, June 19, 2014

Lesson 2 - The Tools for the Job

There are too many kitchen tools out there. Garlic choppers. Carrot twirlers. Asparagus whippers. Remember in the 90's when we all bought those massive, UFO style dehydrators that took up more space than our stovetop, and then realized we could do the same thing in our oven with the door cracked at 200°?

Same principle here when it comes to gear: Knife, Pan, Tongs, Done. Watch the video for details

Groceries: You know and I know you're at the store three times a week already picking up extra milk or something for the lunchboxes or party on Friday. But Americans treat meal shopping like the Apocalypse is coming. Buying two weeks worth of groceries ends in food waste, unnecessary spending, and guilt because we didn't make all the meals we'd planned.

Eating well and cooking fresh is a time commitment. Shop often - every three days or so. Just grab enough for a meal or two when you're restocking your milk or bread. You waste less food, and keep fresher ingredients. When you reach the point where you're not planning from recipes ahead of time, you can buy whatever is on sale that day or whatever's cheap. Because you'll know what to do with it, and you can do it tonight, even without a recipe.

Here's a short list of ingredients to keep on hand that you can use for almost anything we're going to do:

Kosher salt
Fresh ground pepper
Grapeseed oil

That's it. Don't believe it? I've made everything from Italian gourmet pasta to French Coq Au Vin by rummaging in my pantry and having those three things on hand. Watch the vid to find out why.


RECAP: 

1. Shop often so you can use fresh ingredients.

2. Make sure to have a good chef's knife, stainless steel, flat-bottomed pan, and a pair of tongs. 

3. Staple ingredients to keep on hand: Kosher salt, fresh ground pepper mill, grapeseed oil. 


Wednesday, June 18, 2014

Lesson 3 - It Tastes Like Chicken

You've got chicken tenders in your freezer right now don't you? You should if you don't. It's a good idea to keep chicken around, and I don't mean the pre-breaded stuff. It's versatile, and can turn mix-mash of unrelated ingredients from the pantry into something impressive, even in an emergency. If I could push you one step further, buying fresh chicken from the local butcher or farmer's market is worth it - you'll never eat the stuff from the grocery store again.

Check out the video for a quick, simple way to prepare chicken, but because I'm sneaky, I'm going to explain why the chicken acts the way it does in the pan, what the sounds and colors mean, and why this technique is the basis for meals you'll likely be making at least once a week for the rest of your life.


RECAP: 

1. Pat chicken dry

2. Season liberally with kosher salt and cracked pepper

3. Get the pan HOT enough to form the water bubble - then turn it down a smidge

4. Grapeseed oil, the chicken strips - don't crowd the pan, don't move them around

5. Once the pan side of the meat has caramelized and formed a nice sear, flip them

6. Rest the meat before eating. 

OPTIONAL:

1. Add some chicken stock, milk, or wine to the pan while still hot - let it pull up the stuck bits. 

2. Reduce by about half and use as a light gravy

Saturday, June 14, 2014

Lesson 4 - Knife Skills Pt. 1

I'm convinced that breaking down real food is the main reason people view cooking as a tedious and time consuming chore. Once you learn how to quickly break down (by which I mean, cut up) basic ingredients like onions, garlic, potatoes, and carrots, the rest is a breeze. But to do that, you need to learn some basic knife skills.

This is easier than you think. I am clumsy with knives, yet I use a huge one everyday and have yet to lose a finger. Don't give up at this point - give this a shot. You'll be surprised how quickly you become confident and slicing and dicing everything from rhubarb to rutabaga. I have no idea what you would use those for, but you'll be able to cut them.


RECAP: 

1. Use the right knife

2. Sharpen it regularly

3. Grip it correctly

4. Practice "the rolling method"


Sunday, June 8, 2014

Lesson 5 - Knife Skills Pt. 2


Everyone still got their knife? Good. Now let's learn how to keep all of our fingers while breaking down food. This is arguably the most important thing you'll learn to do in the kitchen, so watch and practice as many times as you need to. You'll be amazed how at it raises your cooking confidence.


RECAP: 

1. Use "the rolling method" to practice on several pieces of celery

2. Grip the celery with thumb and pinkie finger

3. Curl the other three fingers with the tips tucked under

4. Middle finger should always be in contact with the blade as you slice

5. Always pay attention to the finger side of the knife - not the sliced celery side


Friday, June 6, 2014

Lesson 6 - Knife Skills Pt. 3

Everyone still have ten fingers? Good. Let's learn the "rolling method" and learn how to break down some more complicated things like potatoes.


RECAP: 

1. Use the rolling method to practice on carrots, potatoes, onions, etc. 

2. Practice long slices with celery - break them down as small as you safely can

3. Practice mincing with your free hand flat on the top of the knife as you pivot slightly between cuts. You can practice this is some of the slices from #1 or #2.

Sunday, June 1, 2014

Quick Tricks for Roasts

You'd be amazed at how many simple little things pro-cooks do to elevate the flavors of their basic ingredients. Here are three quick tricks that are easy, yet make a world of difference when it comes to the end product. Even if you just like to throw things in a crock pot, some of these will make your meals even better, at no expense, and only a little time.


QUICK TRICK 1: Brining

 Brining: 

1 gallon water
1/2 - 3/4 cup kosher salt
12 cup sugar

Note: This method works especially well with chicken pieces or whole chickens, turkeys, short ribs, and tough cuts of meat. 


More great info on Brining times and tricks at CookShack


QUICK TRICK 2: Searing


Searing:

1) HOT pan - grapeseed oil

2) Coat roast with kosher salt and cracked pepper

3) Using tongs to lay the roast facing away from you, sear each side until it has a crispy brown crust to hold in the juices


QUICK TRICK 3: Saucing


1) With "sucs" or the leftover "fond" in the pan and some oil, keep the pan at a moderatly high heat and add some aromatics (